Showing posts with label dessert. Show all posts

Saturday, June 4, 2011

Peanut Butter and Jelly Cookies

Want a favorite childhood sandwich in a bite-sized cookie?  Here ya go!

Ingredients

Originally published in Martha Stewart Magazine
1 1/4 cups all-purpose flour
1/2 teaspoon baking powder
1/2 teaspoon baking soda
1/2 teaspoon salt
3/4 cup smooth peanut butter
4 ounces (1 stick) unsalted butter, softened
1/3 cup packed light-brown sugar
1/3 cup granulated sugar, plus more for rolling
1 large egg
1 teaspoon pure vanilla extract
1/4 cup jam (your choice!)

Method

Preheat oven to 350 degrees. Whisk together flour, baking powder, baking soda, and salt. Beat peanut butter and butter with a mixer on medium speed until smooth.


Add sugars, and beat until pale and fluffy. Add egg and vanilla, and beat until incorporated. Reduce speed to low. Add dry ingredients, and mix until combined.


Scoop level tablespoons of dough, and form into balls.


Roll each ball in granulated sugar, and transfer to parchment-lined or spray the baking sheets, spacing about 2 inches apart.

Bake until cookies are puffy, about 10 minutes. Remove from oven, and make indentations in centers with your finger. Careful they're hot.


Return to oven, and bake until edges are golden, 6 to 7 minutes more. Transfer sheets to wire racks, and let cool completely.

Spoon about 1/2 teaspoon into each indentation.


 I decided to only make about 1/3 with the jam, the others I added some semi-sweet chocolate chips on top and also kept 1/3 plain old peanut butter cookies.

Enjoy!


Tuesday, May 24, 2011

Strawberry filled Cupcakes


Once in a while at my school we have retired teachers sub in for teachers that are out.  The other day I got to spend my day with a teacher from last year who is so fabulously talented, sweet, and just an overall wonderful lady.  It was her birthday the following day so, obviously, I needed to  bake something special.  I wanted individual cupcakes for the children, but with something inside that would get them excited.

Jam!

Strawberry jam! You can get creative, but since I was working with picky little preschoolers here I decided to stick with the good stuff... Smuckers Seedless Strawberry Jam.

Here's an easy recipe for vanilla (versatile) cupcake that will never fail:

Ingredients

3 cups all-purpose flour
2 cups granulated sugar
3 teaspoons baking powder
1 teaspoon salt
2 sticks unsalted butter- room temperature
1 cup sour cream
2 large eggs,
4 large egg yolks
3 teaspoons vanilla extract

Method

1. Preheat oven to 350 degrees F. Line standard muffin/cupcake tins with paper or foil liners.
2. Whisk together flour, sugar, baking powder, and salt in bowl. Add butter, sour cream, egg and egg yolks, and vanilla.
3. Beat at medium speed until smooth (about 30 seconds).
4. Pour into cupcake tins. Bake until cupcake tops are pale gold and toothpick or skewer inserted into center comes out clean, 20 to 24 minutes. Remove the cupcakes from tin and transfer to wire rack; cool cupcakes to room temperature before cutting, adding jam, and frosting.


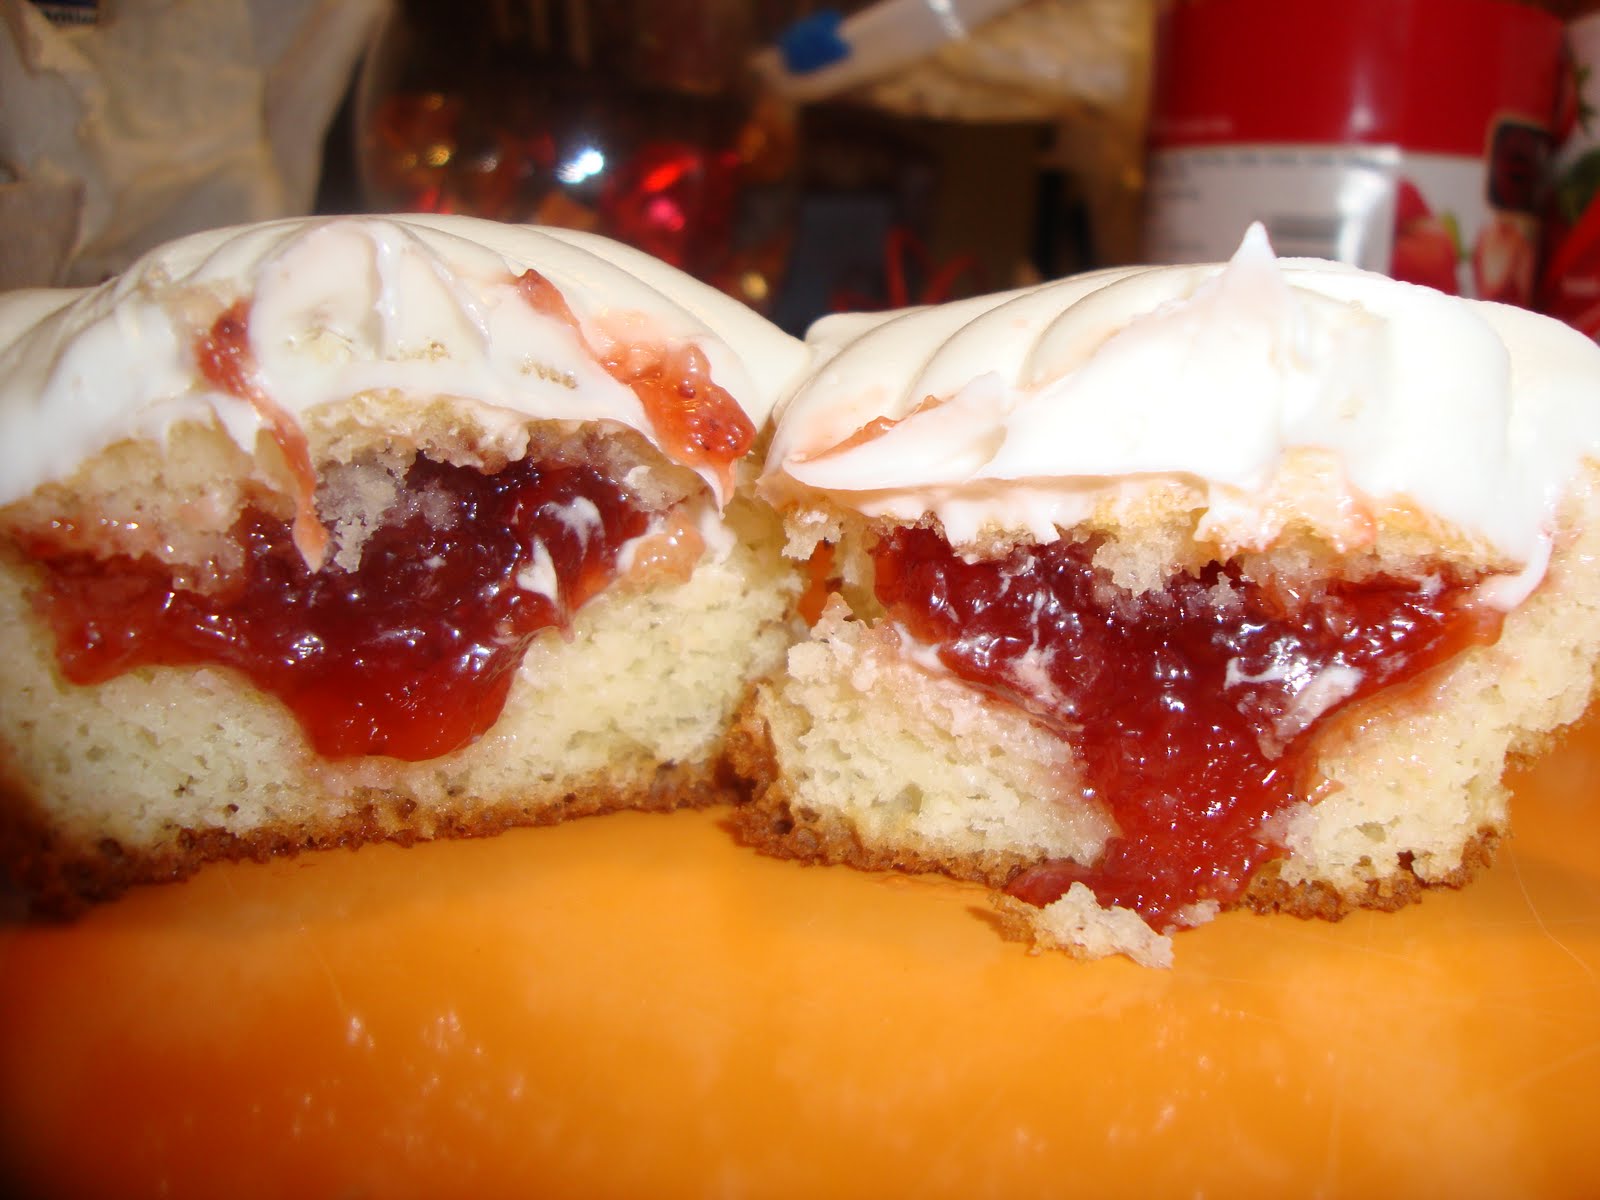
After they cool you're going to take a sharp knife and cut a hole in the top of the cupcake.  You're going to want to hold your knife at a 45 degree angle so that there is a hole in the center. Scoop out a little extra of the center so you can "jam the jam" down in there.


Take a tablespoon or so of your jam and place it in the hole. 


Put the tops back on!

 
Next, frosting!

Easy Buttercream Frosting

Ingredients

2½ sticks unsalted butter, softened
2½ cups confectioners’ sugar
A pinch salt- please don't skip this step, it really does make a difference
1 teaspoon vanilla extract
2 Tablespoons heavy cream

Method

1. Beat the softened butter at medium-high speed until smooth, about 20 seconds.
2. Add confectioners’ sugar and salt.  Beat at medium-low speed until the sugar has just become wet, about a minute.
3. Scrape down the sides and continue beating for another 30 seconds until mixture is fully incorporated, about 30 seconds.
4. Add the vanilla and heavy cream, and beat at medium speed until incorporated, about 20 seconds, then put the speed at medium-high and beat until light and fluffy.

Put into a zip-lock and cut a slant at the tip.

Frost away!


I like to start on the outside and swirl my way to the middle leaving the height in the middle of the cupcake.


I had to cut one in half to photograph it. Here's its insides.


Jesse (my roomate) enjoyed that I needed to do that. That's his hand, not mine.


Oh, and he also made himself a lamb burger and said, "Take a picture of this and put it on your blog." Here ya go Jesse..

Friday, May 20, 2011

Chocolate Truffles


Picture
SO delicious. These chocolate truffles are the easiest way to fake that you're a gourmet dessert chef. I've been reading some blogs that have the chocolate truffle recipes on them and have been wanting to create them myself for some time now.

So, today's the day.

They're the simplest candy to make for your sweetheart or for... yourself.  Dark chocolate, cream, vanilla. These balls of heaven only require three ingredients and some time.

Basic truffle ingredients
  • 8 ounces of semi-sweet or bittersweet chocolate (high quality, 62% cacao or higher), *well chopped into small pieces*
  • 1/2 cup of heavy whipping cream
  • 1 teaspoon of vanilla extract
Truffle coatings
  • Cocoa powder
  • Rainbow sprinkles
  • Finely chopped almonds

Method
 
1. In a small saucepan bring the heavy whipping cream to a simmer (this may take a while, be sure to stir and scrape down the sides with a rubber spatula every few minutes).

2. Place the chocolate in a separate bowl. Pour the cream over the chocolate, add the vanilla, and allow to stand for a few minutes then stir until smooth. (This chocolate base is called ganache.)

3. Allow to cool, then place in the refrigerator for two hours. Remove and with a teaspoon roll out balls of the ganache. Roll in your hands quickly.

4. Roll in cocoa powder or chopped nuts and serve, or place on wax paper and into the fridge.

Makes about 20 truffles.

Here's the only ingredients I used:
Picture
Chop that chocolate. Don't eat any!
Picture
1/2 cup heavy whipping cream.                                                                                                    Into a deep pot. Bring to a simmer.
Picture
Pour the simmering cream onto the chopped chocolate. Add the vanilla. Let this sit for a minute so the chocolate heats.
Picture
Stir it until it looks like this. Smooth and wonderful.
Picture
Place these in the refrigerator for about an hour. This will harden the chocolate just enough so when you scoop it out with a teaspoon it will form.

Once you scoop it out, roll it in your hands to form an even ball. The warmth of your hands will melt the chocolate just enough so you can put it into a topping of your choice where it will stick.  I used cocoa powder, chopped almonds, and little round sprinkles as my toppings.  Be creative! Some other toppings I just randomly thought of are:

  • Chopped pistachios, hazelnuts, or any nut of your choice
  • Coconut
  • Chopped peppermint candies (for Christmas time!)
  • Tasty children's cereal crushed up... like: Fruity pebbles, fruit loops, captain crunch, honey nut cheerios, etc.
  • Cinnamon sugar
Picture
Put them back in the fridge to save for guests or...... eat them right away.

Picture

Tuesday, May 17, 2011

Strawberry Oatmeal Bars

This recipe is very simple and way too delicious.  I stopped and looked for a jar of fig preserves, but instead settled for some strawberry preserves.  I like this recipe because it uses what you have around the kitchen, bakes fast, and doesn't make a huge mess in the kitchen.


Ingredients
  • 1/2 cup packed brown sugar
  • 1 cup flour
  • 1/4 tsp baking soda
  • 1/8 tsp salt
  • 1 cup rolled oats (I used 5 grain)
  • 1/2 cup butter
  • 3/4 cup strawberry preserves (or any other flavor you might like)
Preheat oven to 350.

Line an 8×8 baking dish with foil and lightly grease.

Put everything together in one bowl except the preserves. I used my hands to crumble the mixture. Get rid of all the large butter chunks.


Press 2 cups of the mixture into the bottom of the prepared pan.


Spoon on the preserves. Room temperature preserves spread easier, if it's cold...just pop it in the micro for a bit.


Spread to within 1/4 inch of the edge.


Lightly press the remaining crust mixture over the top of the strawberries.
 

Bake for 35-40 minutes or until lightly browned.


Yum

Monday, May 2, 2011

Spider Cupcakes


Picture
     Last week I taught the children all about ants, the previous week was about caterpillars and butterflies, and this week is all about spiders.  Teaching preschool in the spring last year was probably one the best things I've done in my life.  That is why I'm so looking forward to this year.  Teaching them about nature like the simple steps of planting a seed or the life cycles of a little creature is so fascinating to them and very satisfying for me to know I was the first one to present such a thing.  I approach them with these insects in a way where they will not be afraid of them.  Imagine not being afraid of the huge black spider that's crawling on your ceiling above your bed! I teach the children about all insects as if they were all really pretty and interesting butterflies.

Unfortunately I don't feel this way about bugs. I hate spiders and beetles, but I do have a soft spot for worms and caterpillars.  When I was a little girl my dad and I used to go fishing. I was in charge of the night crawlers. My job was to rip the worms in half and put the wiggling bloody bodies on the hooks. I loved it. Thank you dad. Thank you for teaching me such a beautiful way to appreciate living things...

Anyways, here are the "spider cupcakes".

Picture
Direction #1.
I said: "Okay my friends, peel off the paper and put the chocolate cupcake on your plate."
What they heard: "Blah blah blah chocolate cupcake blah blah blah."
Picture
Direction #2:
What I said: "Now take your plastic knife and your cup of frosting and frost the top of your cupcake."
What they heard: "Put as much frosting on your hands and squeeze the cupcakes into a ball of dough. Oh, and make sure you get crumbs all over the floor."
Picture
Direction #3:
What I said: "Here is some vanilla frosting you can add as well if you'd like. Frost it on top with your plastic knife."
What they heard: "Rub the frosting together on the cupcake with your hands. Please get it on the table, chairs, all over your face, and in your hair."
Picture
Direction #4:
What I said: "Gently take your fingers and place the spider's eyes (Smarties) and sprinkles on top of the frosting."
What they heard: "Immediately dump all the candy on the floor. Then step on it so it gets into the carpet."
Picture
Hahahaha. This one (above) cracks me up.

Direction #5
What I said: "Slide the pretzel sticks into the side of the cupcake. Spiders have 4 legs on each side. Put 4 pretzels on each side of the cupcake."
What they heard: "Everyone fight over and grab the plate with the pretzels in it at the same time so they spill everywhere and break into small pieces."
Picture
Although the entire classroom was a disaster after our creation, they came out awesome.
They also tasted awesome...judging
from the silence that came from the lunch tables while they ate them.
Picture

Saturday, March 19, 2011

Pear Tart

Picture
I wanted to bake today, obviously, so I set out to my favorite quality, convenient, and moderately-priced market named, Russo's. I recently baked with some apples and I wasn't in the mood for citrus or bananas, so pears it was. I also went to the store right from school without any kind of  game-plan besides "letting the food inspire me," haha. Well, it worked.

Here's just one little side-length of the fruit they have there. I picked 5 of the pears to the left called Bosc Pears, which have a brown and grainy skin, but their flesh is soft, sweet, and juicy.
Around the corner was the WALL of various nuts. I went with the plain and simple sliced almonds.
Picture
I also took some cool shots of the dried home-made pasta the nice lady was delicately displaying.
Well, I don't know if she was that nice... she wouldn't stop moving while I took pictures. Here's the best one...
Picture
Here is what I left with.
All brown items! The bulgur wheat isn't for my recipe, neither the kiwis...I just couldn't pass them up.
Top right is a package of Sultanas or "golden raisins."
Picture
I had to eat a kiwi before getting to my baking.
I leave the skin on now...it adds a sort of crunchy texture to the fruit and it doesn't taste bad at all!
Picture
Okay, time to bake.
Since I had the following three key ingredients (pears, almonds, golden raisins), I thought I'd make a simple butter cake to go underneath. I'll call it... "Pear Cake!!"

Pear Cake Recipe

1 lb of pears, removed seeds and sliced
1 cup (2 sticks) softened butter
1 cup granulated sugar
1 1/2 cups flour
1/3 cup golden raisins
1 Tbsp granulated sugar (for sprinkling)
1/3 cup sliced almonds

Glaze:
2 Tbsp melted butter
2 Tbsp brown sugar
1 1/2 Tbsp dark rum

Directions:
1. Preheat oven to 350 degrees and grease an 8-inch round spring form pan.
2. Measure 1/3 cup golden raisins in your measuring cup, leave them in while pouring dark rum up to the top. Let them soak.
3. Mix the flour and baking powder with a whisk and set aside.
4. Beat sugar and butter together.
5. Add eggs one at a time and beat until smooth.
6. Fold flour mixture into butter and sugar mixture with a spatula until combined.
7. Pour batter into spring form pan and spread evenly.
8. Spread the sliced pears on top of the batter and sprinkle with 1 Tbsp of granulated sugar.
9. Add golden raisins and sliced almonds.
10. Mix remaining butter, brown sugar, and rum into a glaze and pour over the top.
11. Bake in 350 degree oven for 35-40 minutes or until center comes out dry on your cake tester.

Here's what you need.
Actually, there's 2 missing ingredients. Can you spot 'em?
Picture
Rum and brown sugar! Oops.

First, drown the golden raisins!
Picture
I think I've said this before, but instead of using the awkward "flour sifter" just whisk your dry ingredients to get out the lumps. So much easier.
Picture
Beat the butter and sugar. Add the eggs one at a time.
Picture
Fold in the flour.
Picture
Spread in the greased-pan.
Picture
Picture
Onto the pears.
Picture
Take out the seeds.
Picture
Done!
Picture
Arrange them nicely.
Picture
Add everything else.
Picture
Out of the oven!
Picture
Picture
Picture
Enjoy!